How to Upload Photos From Iphone to Pc Without Itunes
How to Transfer Photos from iPhone to PC Windows without iTunes
Q - "Is in that location a way to import photos from iPhone (thirteen/12/Pro/XS..) to PC without iTunes? I got my iPhone filled with valuable family photos, videos, and music. I want to sync my iPhone photos to Windows 11 for backup without whatever of them to be deleted. "
Photo transfer from iPhone to PC can exist washed in multiple means, traditionally through iTunes, which nonetheless is sort of the way most people have pains to avoid. That's why we prepared here best eleven ways of iPhone photo transfer without iTunes. The nigh recommended one is to use WinX MediaTrans, a photo manager software, for its ease of use and fast syncing speed.
Fashion ane. Transfer Photos from iPhone to PC with WinX MediaTrans
If iTunes is more of a nightmare to you, then the biggest reason for using WinX MediaTrans will be that it is a stand-alone iPhone file manager that requires no iTunes. To be precise, it is the Only software in the market that allows yous to ditch iTunes and its components all together while transferring files between iOS 15 devices and PC. Checklist of what WinX MediaTrans can practice,
- Transfer photos from iPhone to PC; sync pictures from PC to iPhone.
- Photo transfer in JPG/PNG/GIF/BMP/TIFF/HEIC (HEIF), transfer iPhone Dark Mode/Smart HDR photos with no quality loss.
- Manage pictures in twenty-four hour period/calendar month/year; transfer photos in batch/selectively.
- Consign HEIC to JPEG; sync videos, music, eBook, ringtone, etc.
Become a lifetime license cardinal at 50% OFF >>
How to Transfer Photos from iPhone to Windows PC with WinX MediaTrans?
Footstep 1: Download WinX MediaTrans .exe file on your Windows 11/10/8/vii figurer and install this photo managing director iPhone by checking the "End User License Understanding" box and clicking "Install" directly. Or you lot can choose "Custom Installation", scan to prepare the file location and "Install Now".
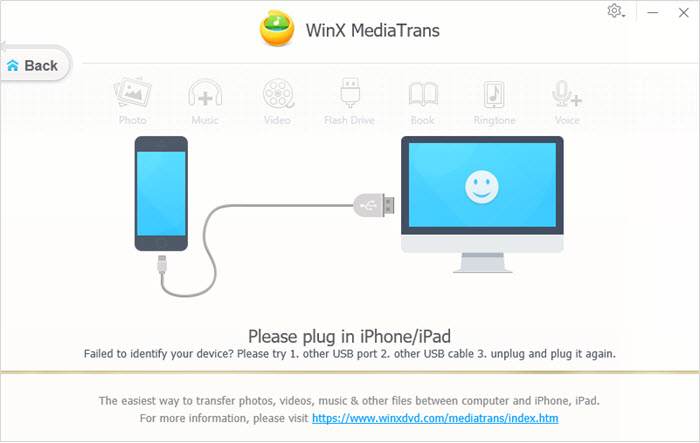
Step ii: Connect your iPhone to PC, ameliorate using an original Apple iPhone USB cable. In that location pops out an alarm box, suggesting you to accommodate iTunes settings to prevent data erasing automatically.
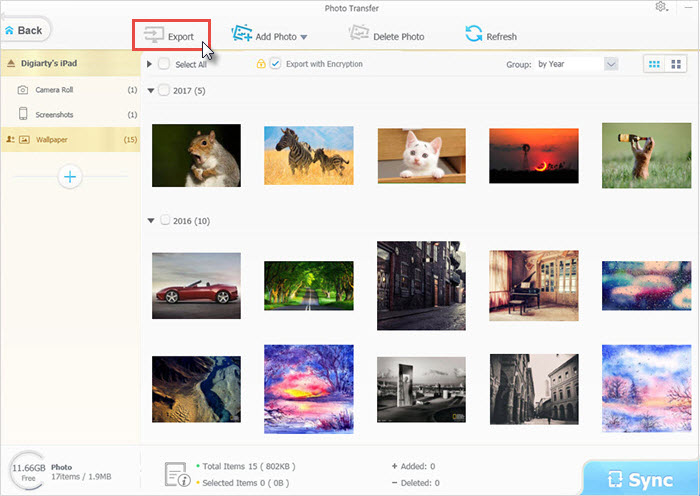
Step three: Click into Photo Transfer on the WinX MediaTrans main interface and you will see all photos on your iPhone grouped past day, month or year (totally up to you). Select photos you desire to sync to PC, click Consign, and it's washed in a wink.
Advantages
- Blazing fast photo transfer speed. Tests prove that transferring 100 4K iPhone pictures takes only 8s.
- Support a broad types of photo formats, smart HDR, Deep Fusion, 12MP Ultra Broad, Wide and Telephoto, etc.
- Support diverse types of information transfer, including videos, music, ringtone, ebook, Podcasts, etc from iPhone to PC and vice versa. Video conversion capability embedded in this iPhone photo managing director software is really a large surprise and will surely facilitate you a lot.
Disadvantages
- Require software installation
Way 2. Transfer Photos from iPhone to Windows xi/10 PC with Windows Photos App
Windows app allows you to tranfer iPhone photos to Windows 10/11 reckoner without iCloud using a USB cablevision. Note that in that location is no option for selecting photo folders. The photos yous want to import should be stored on your iPhone instead of in the deject. How to transfer photos from iPhone to Windows 10/11 through Windows Photos app? Follow the steps below.
- Connect your iPhone with Windows ten/11 PC through USB cable.
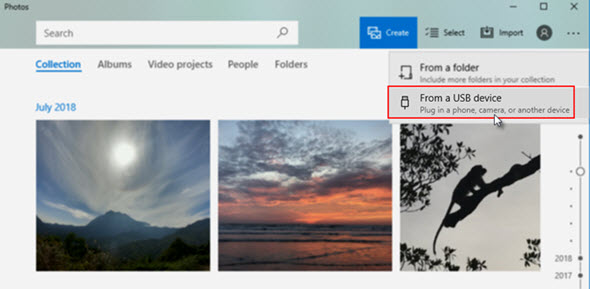
- Click the Showtime push button and then select Photos to open up the Photos app on your computer.
- Recollect to unlock your photo to let data access. Select Import > From a connected device.
- Choose your iPhone photos to showtime transferring photos to Windows 10/xi PC.
Tips:
one. If the Photos app doesn't auto pop up, so, blazon and search "Photos" app in Windows 10 Cortana and click to open up it. Or search and click into "Telephone Companion" in Cortana and click "Import photos and videos" in the lesser left corner. Become to "Import" in the tiptop right corner. Click information technology and you will come across two options in the drop-downward menu. Choose "From a connected device".
2. To transfer photos from iPhone to Windows 11/10 PC with the Photos app, you need to accept the latest version of iTunes installed. It requires iTunes 12.5.one or later. If you see a prompt your iPhone asking you to Trust This Computer. Choose Trust or Allow to proceed.
3. Unlock your iPhone when neccessary. You can't download iPhone photos to Windows PC via Windows Photos app when iCloud is enabled on your iPhone.
4. Try a unlike USB cable if your iPhone is non connected correctly.
v. To make certain your iPhone photos are compatible with Windows 10/11, tap Settings on your iPhone > Photographic camera > Formats > About Compatible, and your iPhone photos volition be in JPEG format instead of HEIC.
Advantages
- Ease of apply
- Needless of software installation
Disadvantages
- Slow photo transfer speed
- The procedure tin can be stuttered
Manner 3. Import Photos from iPhone to Windows Computer with File Explorer
It'due south as well a skilful idea to download photos from iPhone to Windows computer with a USB cable using File Explorer. File Explorer in Windows x is called Windows Explorer on Windows 11, they are the aforementioned matter. File Explorer helps yous access your files quickly. To open up File Explorer on Windows, click the Start button and detect the File Explorer, or choose the folder icon on the taskbar, or press the Windows logo key +Eastward. Here'southward how to transfer photos from iPhone to Windows 11/10/8/7 computer with File Explorer using USB cablevision.
- Plug your iPhone into your PC using a USB cable.
- Launch File Explorer on Windows computer. On Windows 8/10, use the Windows Key + Eastward shortcut on the keyboard.
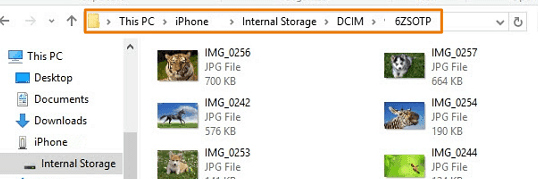
- Click the arrow next to This PC. You should see your iPhone under Devices and Drives (under Reckoner on Windows 7).
- Click your iPhone's name. Double click Internal Storage > DCIM. Find the folder that contain the pictures y'all want to transfer to Windows computer.
- Double click the folder, re-create the pictures to the location yous'd similar to store your photos. Don't unplug your iPhone during the photograph transfer process.
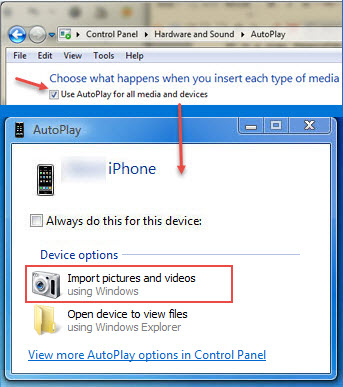
Way 4. Transfer Photos from iPhone to Windows 7 Calculator with Autoplay
At that place'south no Photos app in Windows seven PC. If you want to import pictures from iPhone to Windows 7 PC, you have the Autoplay option, simlar to the Photos app. To transfer photos from iPhone to Windows 7 PC via Autoplay, you also demand a USB cable. Advantages and disadvantages of using Autoplay feature are also similar to using Photos app to transfer iPhone photos to PC. Apply steps below on Windows vii calculator.
- Connect the iPhone to your Windows 7 figurer using a compatible USB cable. Unlock and turn on your iPhone.
- The AutoPlay dialog box appears. Click Import pictures and videos using Windows.
- Click Import and the imported iPhone photos and videos should exist in the picture folder.
Tips:
If you don't encounter the AutoPlay dialog box, endeavor clicking First > Computer > right click your iPhone > Import pictures and videos > Import. Now, yous should run into the Windows with the imported pictures and videos displayed.
Your iPhone Pictures that has been already imported to your Windows vii calculator won't be detected this time. The imported pictures can be viewed with the Windows Photo Viewer.
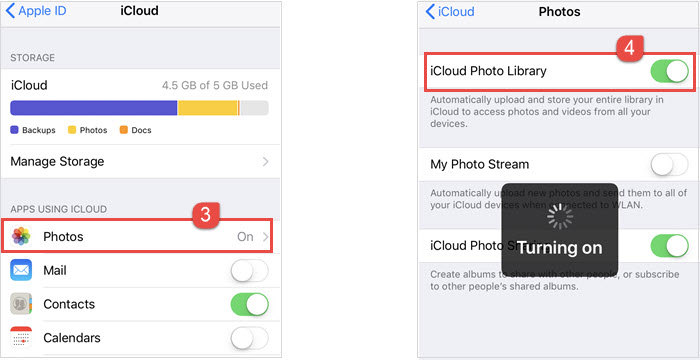
Fashion v. Transfer Photos from iPhone iPad to PC Wirelessly with iCloud
Compared with iTunes, iCloud is much better for iPhone photograph backup and transferring to PC. The whole backup process is done almost unconsciously anytime there is wireless network or you accuse the telephone. Using WiFi, you can transfer photos from iPhone to iCloud Photograph Library wirelessly, and and then access icloud.com or iCloud for Windows and download iPhone photos to PC. Below is how to transfer photos from iPhone to PC wirelessly via iCloud?
- Go to "Settings" and click your proper name to get into Apple ID interface.
- Find "iCloud" and click to move on.
- Click "Photos" under "APP USING ICLOUD".
- So plough on "iCloud Photo Library".
Tips:
On Windows ten/eleven, yous can download iCloud for Windows from the Microsoft Shop. On Windows 7/8, go to Apple's website to download iCloud for Windows. If iCloud for Windows doesn't install automatically, attempt to open the File Explorer and click iCloud Setup.
When backup and transfer iPhone photos to PC via iCloud, don't disable iCloud Photograph Library on a whim, which may erase all your pictures. If you get to "Settings -> Apple ID -> iCloud -> Storage -> Manage Storage -> iCloud Photo Library -> Disable and Delete" on iPhone, then your photos backed upwardly to the deject will be deleted likewise.
Advantages
- Elementary to utilize
- Needless of software installation
Disadvantages
- 5GB gratis backup storage. 5GB is far from enough to fill-in UHD photos in 4K resolution or large raw file, permit alone music and 4K videos. Yous do take a plan B - pay to get more than storage monthly: $0.99/1000 for 50G and $2.99/m for 200G.
- Internet connection is required to transfer iPhone photos to Windows.
- A sync method. You delete a photograph from iPhone, then information technology volition likewise be removed from iCloud.
Way six. Transfer iPhone Photos to Windows Computer without iTunes via Email
It'southward also easy to transfer iPhone photos to a Windows computer wirelessly without iTunes/iCloud using email. And so log in with your electronic mail business relationship on a Windows computer and download the photo attachment. The email way works fine when y'all simply have a handful of pictures to upload from iPhone to Windows. Hither's how to import a photograph from iPhone to Windows through Mail.
- On your iPhone, open the Mail app.
- Tap in the email where yous want to put the photo, so tap the Expand Toolbar button in a higher place the keyboard.
- Tap the picture icon to a higher place the keyboard, browse and choose the photo you lot want to transfer via email from iPhone to Windows PC.
- Tap the arrow icon to start emailing the photo from your iPhone to your account.
- Login with your email business relationship on your Windows computer and download the fastened iPhone photos to your calculator.
Advantages:
- Like shooting fish in a barrel to apply
- Crave no app installation, USB cablevision
Disadvantages:
- Non suitable for lots of (4K) photos
- Limited zipper size (Gmail 25MB, Outlook and Hotmail 10MB)

Way 7. Transfer iPhone Pictures to Windows without iTunes/iCloud via Google Photos
Google Photos is a groovy place to support and shop photos and videos. With "backup & sync" turned on, your iPhone photos will automatically get backed upward. If you take Google Photos on your iPhone, you can upload your iPhone pictures to Google Photos, then copy them to your Windows computer wirelessly without USB cable. It'due south too easy to upload a certain of iPhone videos to Windows via Google Photos without installing the app. Use the following steps to do then.
- Open photos.google.com in Safari on your iPhone.
- Login with your Google account.
- Tap Upload > iPhone > Photos library. Cull the pictures you'd like to transfer from iPhone to Windows.
- Download and copy your iPhone photos to Windows PC via photos.google.com. On your computer, become to photos.google.com > choose pictures > Click the More icon, then choose Download and salve your iPhone photos to Windows.
Advantages
- 15GB of free storage
- Well-designed and ad-complimentary user interface
- Machine-sync photos and videos from iPhone when connected to the internet
Disadvantages
- Lack flexibility in deleting and managing iPhone photos
- Only integrated with Android phones and tablets

Style 8. Import iPhone Pictures to Windows without iTunes/iCloud via Flickr
Flickr is a pop website to upload, store, and organize photos from iPhone or PC. You tin upload your iPhone photos to Flickr, and so download these iPhone pictures to a Windows figurer using the same Flickr account. The guide below volition help you learn how to get your iPhone photos uploaded and downloaded to a Windows laptop wirelessly without iTunes/iCloud/USB cable. Annotation that a maximum of 500 photos are allowed and RAW photos are non supported currently.
- On your iPhone, open up the Flickr app and tap the camera > the epitome > iOS Albums.
- Tap the Album icon and choose an existing photograph album or create a new album to upload your photos or videos. Select the Album and tap Salvage.
- Choose the photos you want to upload to Flickr, so tap Next. You tin can name a championship and tap Done.
- On your Windows reckoner, open Flickr and log in with your account. Click You > Photographic camera Roll.
- Choose the photos you lot want to download to Windows (maximum 500). Click Download and Create Nix file. Yous will receive a Flickr e-mail including a link to download the zip file.
Advantage
- A pop site to upload, shop, and share photos
- Photos in HEVC/HEIF are converted to JPEG format on iOS during uploading to Flickr
Disadvantage
- RAW photos are not supported
- Max 500 photos download each time

Mode nine. Upload iPhone Photos to Windows (10/xi) Wirelessly via Twitter
Social networking site is also a good way to movement iPhone photos to Windows computers. Here we share Twitter manner beneath. You'd better know before you go that the Twitter way is only suitable for photos smaller than 5MB and less than four. If you lot accept many photos that need to be moved to Windows, resort to other ways shared in this commodity.
- On your iPhone, go to Twitter, click the photo icon to upload a photo from your iPhone.
- The photo you select will attach to your Tweet in full size. You can upload a maximum of 4 photos to Tweet at a time on your iPhone.
- Click Tweet to mail.
- On Windows PC, log into your Twitter account. Find the photo you'd like to save to the computer.
- Right-click the paradigm and select Save Image As. And then the iPhone paradigm will download to your Windows PC.
Advantages
- Easy to apply
- iPhones are shared to Tweet at the aforementioned time
Disadvantages
- Maximum 5MB photos, GIFs 15MB on web
- Only i-four photos can be uploaded at a fourth dimension

Manner ten. Add iPhone Photos to Windows PC without iTunes via Evernote
Evernote is a top-ranked note-taking app that too allows users to store photos in notes. You can use Evernote to move iPhone photos to a Windows computer without iTunes/iCloud. Evernote has an easy-to-apply interface. Use the following steps to transfer iPhone photos to the Windows calculator.
- On the new version of Evernote for iPhone, open an existing note or create a new note.
- Tap Edit > the blue plus sign at the top left > Image and attach iPhone photos.
- On Windows, open up Evernote, log in with your account.
- Observe the photo you lot desire to download, right-click the photograph and choose "Salvage As...". Choose a place to save the photo. Change the filename as you wish.
- At present, your iPhone photos will be moved to a Windows computer from Evernote without using iTunes/iCloud.
Advantages
- Elementary to use, clean interface
- Photos can exist stored, accessed, and edited easily
Disadvantages
- Free accounts have 25MB limits in size, the Personal subscriber is 200MB in size
- The free version is quite limited and the update is expensive

Way xi. Transfer iPhone Pictures to Windows PC without iTunes with Dropbox
Dropbox, ane of the best cloud storage service, tin be used to motion your iPhone photos to Windows computer without iTunes/iCloud for free. Costless users get 2GB storage infinite to start. It's secure and reliable. Photos y'all upload to Dropbox will be accessible on other device you connect to your Dropbox account. Here's how to upload iPhone photos to Windows (x/11) using Dropbox.
- Open the Dropbox mobile app and open the folder where you want to save your iPhone photos.
- Tap the "+" button > Upload Photos, and choose the photos on your iPhone to upload.
- Tap the Next and choose a binder to shop the photos.
- Tap Ready location > Upload and your iPhone photos will be uploaded to Dropbox quickly.
- On Windows PC, open dropbox.com, sign in with your account.
- Find the photos transferred from iPhone or photograph folder yous want to download. Click the ellipsis icon and then click Download to save your iPhone photos to Windows computer.
(If you have Camera Uploads enabled on iPhone, your iPhone photos will be saved to Dropbox automatically. To enable Camera Uploads, open up the Dropbox app on iPhone, tap the person icon > Camera Uploads > Ok, choose what you desire to support to Dropbox, tap Support my photos.)
Advantages
- Support photos in large file size
- Support download photos in nix
- Sync photos across devices
Disadvantages
- 2GB of free storage space for starters
- No flexibility in organizing photo files and folders

iTunes: The Least Tolerable Choice of Windows Users
iTunes has been used to sync datas between iDevice and figurer for a long time. Surely, it can be counted equally a good music manager, which, notwithstanding, is absolutely not a preferred option for iPhone photograph backup to PC for the following reasons:
i. iTunes errors happen all the time on Windows PC
For case: iTunes runs slow, iTunes keeps crashing, iPhone won't connect to iTunes on Windows PC, etc. You can imagine that transferring photos from iPhone to PC using iTunes would be total of twists and turns.
2. Transfer photograph from iPhone to PC is not permitted
In that location is no problem to import pictures from PC to iPhone with iTunes, which however doesn't allow you to download photos from iPhone to PC probably for privacy protection. FYI, photos downloaded from PC to iPhone can't be deleted, which is not convenient for managing photos on iPhone and will eat up space.
three. Complicated and time-consuming
It is so complicated and fourth dimension-consuming for noobs of tech things to detect out where the iPhone backup photos are stored on PC. And you cannot open the file even if you discover information technology, because there is no file extension, and your engine can't figure out what app should be used to open it.
FAQs about How to Transfer Photos from iPhone to PC
How do I transfer photos from iPhone to Windows computer?
You take several ways to import pictures from iPhone to Windows 11/10/eight/7 figurer, using USB cable, wirelessly, electronic mail, using Windows Photos app, File Explorer, Autoplay feature, etc. At that place are also multiple good iPhone photo transfer and manger app, such as WinX MediaTrans.
What is the best fashion to transfer photos from iPhone to PC?
WinX MediaTrans offers the best style to transfer photos from iPhone to Windows PC with photos well organized. Open up WinX MediaTrans on your PC, connect your iPhone to PC with a compatible USB cable, click the Photo Transfer button on the primary interface, cull the photos you want to transfer. Click the Export push to start transferring photos from iPhone to PC.
How to transfer photos from iPhone to Windows computer with USB?
To import photos from iPhone to Windows PC with USB cable, resort to Windows Autoplay feature (Windows 7), Windows File Explorer, or Photos App. Connect your iPhone to Windows calculator with USB, open File Explorer, Photos App, or Autoplay, and download your iPhone photos to Windows direct without using iTunes/iCloud.
How to transfer photos from iPhone to Windows PC wirelessly?
Windows PC doesn't support the AirDrop feature. Some photo apps allows you to download iPhone photos to Windows wirelessly. There are some other free ways to motility photos wirelessly, such as emailing, sending iPhone photos to social media sites start, then downloading them to your Windows computer.
Tin can you AirDrop photos from iPhone to Windows?
Windows calculator doesn't back up AirDrop feature. You can't directly AirDrop iPhone photos to Windows estimator. To transfer photos from iPhone to Windows wirelessly without cable, utilise iCloud, Google Photos, emailing, or other social media websites.
Can I install AirDrop on Windows?
No, there's no AirDrop for Windows. AirDrop only works with Apple devices. If y'all desire to motility photos from iPhone to Windows PC, you can use Windows 10's Nearby Sharing feature, which is similar to AirDrop. The Share feature is congenital into File Explorer/Windows Explorer on Windows x/11. iPhone photos tin can be transferred to Windows PC over Wi-Fi or Bluetooth.
Other Useful How-to Guides
ABOUT THE AUTHOR

Estrella H. 
Estrella H. is a senior editor at Digiarty roofing all the latest tech in mobile manufacture for the better part of the first 4 years, from iPhone, Samsung to other innovative gadgets. And now she'southward been dived into data backup and management to proceed data safe on mobile devices in the recent three years. Outside the tech, she is a songwriter and loves hip-hop.
frenchpallarcups1958.blogspot.com
Source: https://www.winxdvd.com/ios-android-mobile/transfer-photos-from-iphone-to-pc.htm
0 Response to "How to Upload Photos From Iphone to Pc Without Itunes"
Post a Comment