Powershell Upload Multiple Files at Once to a Web Server
If you need to transfer files securely with SFTP and know a petty about PowerShell, you're in luck. In this tutorial, you will acquire how to work with files remotely via SFTP and dig into some of the unlike PowerShell SFTP modules you can use.
Non a reader? Watch this related video.
Not seeing the video? Make sure your ad blocker is disabled.
Let's dive in!
Prerequisites
This tutorial volition be a easily-on demonstration. If y'all'd similar to follow forth, be certain you have the following:
- A remote SFTP server – This tutorial will use Windows Server 2019's FTP server.
- PowerShell – You tin use both Windows PowerShell v.1 or PowerShell v7+.
Managing Files over PowerShell SFTP with the Posh-SSH Module
The Posh-SSH module is a handy module to work with files over SFTP. To get started, open PowerShell as administrator and run Install-Module to download and install the module from the PowerShell Gallery. If prompted about an untrusted repository, type Y or A to ostend.
Install-Module -Name Posh-SSH Downloading Files and Folders from the SSH server
At present that you accept installed the module let'southward look at downloading files. To download files, you must offset gear up a session. The session is a persistent connection you'll use to perform diverse SFTP operations.
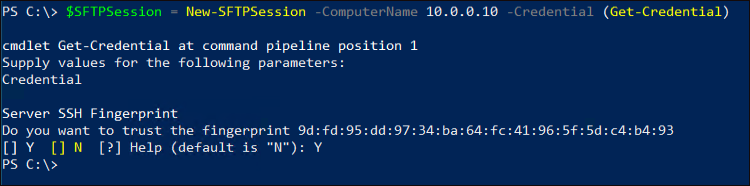
To set up a session, provide a PSCredential object via Get-Credential and specify the remote SFTP server you'd like to connect to using the New-SFTPSession control. When invoked via the control below, PowerShell will prompt yous for a username and countersign.
$SFTPSession = New-SFTPSession -ComputerName 10.0.0.10 -Credential (Get-Credential) 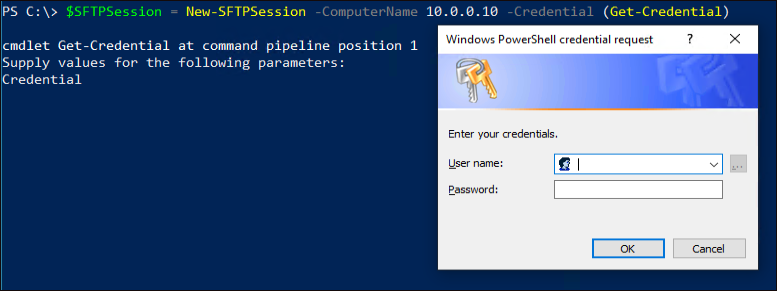
If the connection is successful, the control will prompt you to accept the Server SSH Fingerprint. This certificate fingerprint will exist how the server trusts the connection from your client.
Now that you've connected to the remote server run the beneath command to download a file from the remote server. This Get-SFTPItem command downloads the /domicile/user01/Downloads/exam.txt file on the remote server to the C:\temp location on the local computer. You'll also see that the control below uses the SessionId property on the SFTPSession object captured in the last pace.
Get-SFTPItem -SessionId $SFTPSession.SessionId -Path /home/user01/Downloads/examination.txt -Destination c:\temp Yous can also download entire folders by providing a path such every bit
/home/user01/Downloadsto thePathparameter.
Uploading Files and Folders to the SSH server
Now that you've seen how to download files and folders from your SSH server let'due south look at how to upload files and folders. The method to upload files is nearly identical to downloading files, equally yous can see below.
Invoke the Set-SFTPItem command providing the session to connect to, the file to upload, and the location on the SSH server to upload the file to.
Ready-SFTPItem -SessionId $SFTPSession.SessionId -Path C:\Temp\test.txt -Destination /tmp You can as well upload entire folders by providing a folder path such as
C:\Temp\TestFolderto thePathparameter.
Disconnecting the Posh-SSH Session
Finally, in one case you are done using the Posh-SSH session, disconnect and remove it from memory with the Remove-SFTPSession. Although this step isn't mandatory, doing and so will cleanly disconnect the server'southward connection and costless upward retentiveness in PowerShell.
Remove-SFTPSession -SFTPSession $SFTPSession Managing Files over SFTP with the WinSCP Module
If you'd adopt not to utilize the Posh-SSH module for any reason, you lot always have another option; the WinSCP module! The WinSCP module is some other handy module that comes from the popular WinSCP GUI utility.
To get started, like the Posh-SSH module, first download and install it from the PowerShell Gallery, equally shown below.
Install-Module -Name WinSCP Inspecting Files and Folders with the WinSCP Module
Now that y'all've installed the module, you can get started using it. Let's outset make a connection to the server. Similar the Posh-SSH module, you must first ever establish a connection to the remote server.
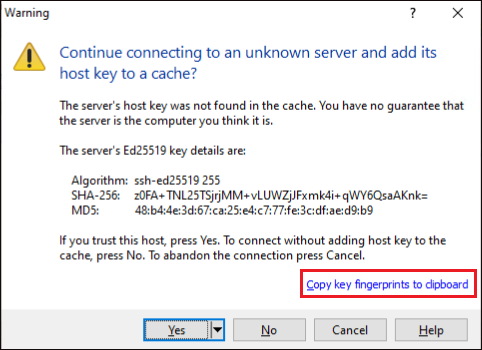
The first time you attempt to plant a connection to the SFTP server, the New-WinSCPSession command volition prompt you to add the server's public central to your local certificate repository. You must do this and so that the SFTP server will trust your local computer.
Click the Copy primal fingerprints to clipboard and paste the fingerprint into a text window to add your key. You'll need this in the adjacent pace. Next, copy the line that looks similar "ssh-ed25519 255 48:b4:4e:3d:67:ca:25:e4:c7:77:atomic number 26:3c:df:ae:d9:b9" anCopy and paste that fingerprint in the script every bit shown in below script.
To plant a connection, below you'll meet an example script. This script creates a PSCredential object that is passed to the Credential parameter of the New-WinSCPSessionOption command and the remote server to connect to and the protocol sftp.
#Enter credentials to connect to FTP server. $FTPUsername = "UserID" $FTPPwd = "UserPwd" $Countersign = ConvertTo-SecureString $FTPPwd -AsPlainText -Forcefulness $Credential = New-Object Arrangement.Direction.Automation.PSCredential ($FTPUsername, $Password) #Import WinSCP module Import-Module WinSCP #Create WinSCP session to your FTP server. x.0.0.3 is the FTP server. $WinSCPSession = PS C:\> New-WinSCPSession -SessionOption (New-WinSCPSessionOption -HostName ten.0.0.3 -Protocol Sftp -Credential $Credential -SshHostKeyFingerprint "ssh-ed25519 255 48:b4:4e:3d:67:ca:25:e4:c7:77:iron:3c:df:ae:d9:b9") At present that you lot've established a connection to the server run the Get-WinSCPChildItem command and provide the session yous only created. This command will enumerate all the files and folders on the remote server from the remote server user'south dwelling directory.
Get-WinSCPChildItem -WinSCPSession $WinSCPSession 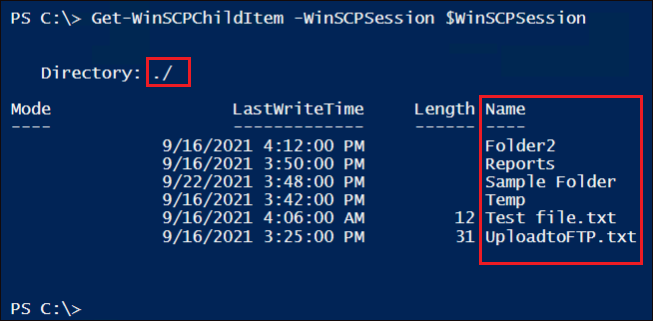
To only listing files in a particular directory, specify the Path parameter as shown below.
Get-WinSCPChildItem -WinSCPSession $WinSCPSession -Path '/Folder2' 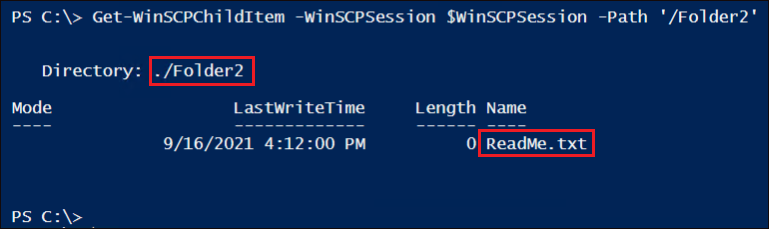
Uploading Files and Folders with the WinSCP Module
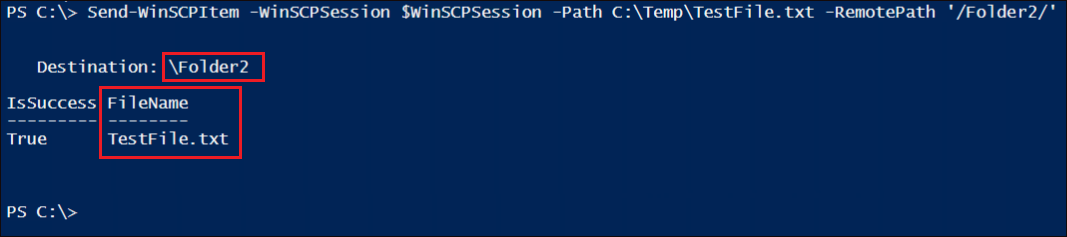
Uploading files and folders is similar to list files with the WinSCP module. To do so, run the Ship-WinSCPItem command every bit shown beneath. By specifying the session (WinSCPSession), the local Path of the file to upload, and the RemotePath to where the file should become, Send-WinSCPItem will upload the file.
Past default, if you practice not specify a path using -RemotePath parameter, your files and folders will be uploaded to the user's home directory you authenticated to the server with.
Ship-WinSCPItem -WinSCPSession $WinSCPSession -Path C:\Temp\TestFile.txt -RemotePath '/Folder2/' When the upload completes, you'll run into that Send-WinSCPItem displays the remote binder path containing the file uploaded.
Yous tin can upload entire folders by providing a path to the
Pathparameter rather than a single file.
Downloading Files and Folders with the WinSCP Module
Downloading files and files with the WinSCP is possible, too, using the Receive-WinSCPItem control, as shown below. To download files, specify the WinSCPSession over again, provide the path to the file or folder you'd like to download via the RemotePath parameter and the local folder you'd like to download to.
Receive-WinSCPItem -WinSCPSession $WinSCPSession -RemotePath '/Folder2/ReadMe.txt' -LocalPath C:\Temp 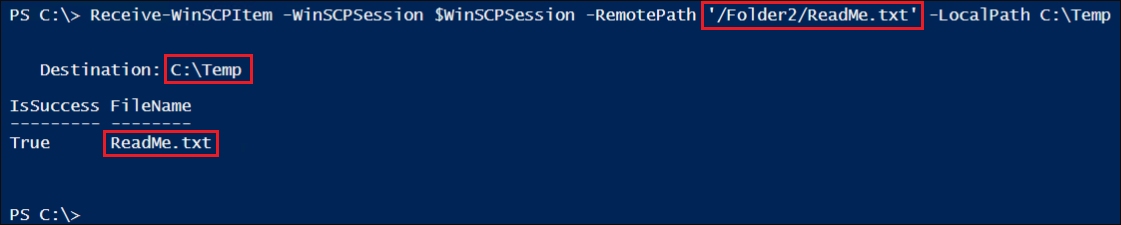
Disconnecting the WinSCP Session
Once you are done using the WinSCP session, disconnect and remove information technology using the Remove-WinSCPSession.
Remove-WinSCPSession -WinSCPSession $WinSCPSession Conclusion
You should at present know how to list, upload and download files via PowerShell SFTP. Thankfully, the community has made modules for everyone to apply freely to brand this job much more manageable.
Which module exercise you adopt to work with files over PowerShell SFTP?
frenchpallarcups1958.blogspot.com
Source: https://adamtheautomator.com/powershell-sftp/
0 Response to "Powershell Upload Multiple Files at Once to a Web Server"
Post a Comment